Traducción por: Lucía Gutiérrez


Hi!
I’m glad that you enjoy my last post! ^^
Today I will show you some make-ups inspired in every decade through the history (the 10s, the 20s). These make-ups won’t be 100% equal as they were on that years because they are only inspired on them, so I hope you understand ^^
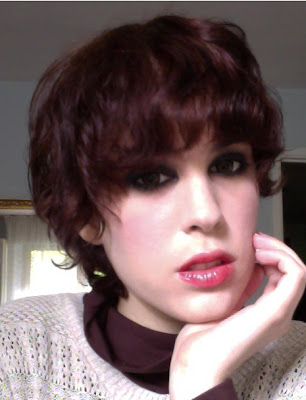
The first one is ‘The 10s make-up’. It’s a very ‘gothic’ make-up because we will have pale skin, smoky eyes and dark colors in our lips =) So… I will explain it step by step with some pictures – illustrations made by me – with a final photograph of me where you could see how it will look. Of course, we must know that facial structures are different in each person and it won’t remain exactly the same!
- Step 1:

- Apply a foundation more pale than the tone of our skin (one or two tones – I recommend you two – less), without any eye concealer or something that hide the bags under the eye, we want see them.
-Apply a layer of translucent powder (is better a pale or, instead, a normal one but DON’T USE a dark one) so that the face becomes smooth and without any shine from our skin.
-Step 2:

- Make a black smoky eye, with ROUNDED finish. Take special care of blurring it well. Delineate the water line and, also, if we can, the upper water line with black eye-liner.
- Step 3:

- Apply ABUNDANT black mascara up and down, to the corner of the eye.
- Step 4:

In the 10s, the original lip was a slide lip. Nowadays, this way would be strange so we will apply only a red intense gloss (you can choose the tone, providing it is a ‘red wine’ tone minimum. You can apply or even mix them up to purple).
- Step 5 [FINAL]:

Finally, apply a pink ‘rounded blush’ blush at the top of the cheek, so that it invades the eyecup a little, but just a little. As we have charged a lot lips and eyes, we will do a discreet blush.
And… that’s all!
I leave you some pictures so you can see the result:
Photos with my Mac, my camera didn’t react well with the light of the rest of the house. I hope to put new photos soon =)
That’s all for today! Photos NOT edited.
I hope you enjoyed this tutorial and, don’t forget that if you take photographs of your version, you can find me in Twitter to show me your result.


